E-Receipts and Quick Expense User App Integration Guide
E-receipts are digital representations of receipts with both a receipt image and structured data. The e-receipts come from pre-authorized and trusted merchants and are transmitted to the SAP Concur platform using our Receipt API (not email) on behalf of individual users who have connected their accounts/profiles between us and the merchant in advance.
Merchants can also use the Quick Expense API to create an expense with basic information such as date, amount, and expense type, with or without a receipt image. The eReceipt or Quick Expense can be added to an expense report within Concur Expense, allowing the user to provide additional details such as attendees, itemizations, etc.
This integration guide helps SAP Concur App Center E-Receipt and Quick Expense user app integration partners to develop and list their apps for the App Center.
Getting Started
New App Center Partners: Your company must have entered into a commercial agreement with us. If you have not yet entered into an agreement, review the information on the Build App Center Solutions page.
Existing App Center Partners: The SAP Concur Platform team will need to configure your existing sandbox, among other things to enable access. You can make that App expansion request by contacting your Alliance Manager.
The E-Receipts and Quick Expense User App needs to be certified before the App is listed in the SAP Concur App Center. Please follow the User App Certification Flow steps to complete your App certification. Please make sure your App achieves all the criteria in Certification Checklist before you schedule the certification demo with the Certification Project Manager.
Development Environment
SAP Concur Certification Project Manager will prepare the development environment for you and send the development environment details to you by email. The development environment includes:
Sandboxes and Accounts
- You will have a shared sandbox on each of following SAP Concur data centers: US2, EU2.
- You will have 3 test accounts on each of following SAP Concur data centers: US2, EU2.
Development App
- A development app will be created for you by your assigned certification manager. They will send you a deep link (url) to the development app along with the app
client_idandclient_secret. These are provided for development and testing purposes only. - You need to send the development app’s connect URL (redirect URL) to PlatformCertification@sap.com before starting the development and testing of the development app.
Production App
- Once you complete the development app certification walkthrough, you will be provided a production app
client_idandclient_secret. - You need to send the production app’s connect URL (redirect URL) to PlatformCertification@sap.com before starting the development and testing of the production app.
- The certification project manager will provide you the deep link (URL) to the production app listing in the App Center. You will be able to access the app listing for development and testing purposes only. After your production app meets all the certification requirements and completes certification, the App Center marketing team will release it in the App Center and users in allowed regions/countries will have the access.
User Connections / Authentication
Depending on the connection flow, a grant will be selected for authentication. The authentication methods below are available to obtain an access_token. Password grant, authorization grant, or one-time password grant is required for certification:
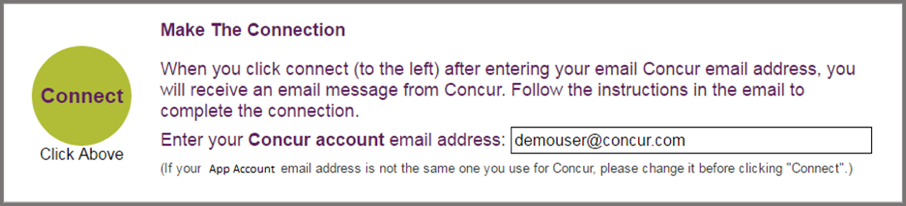
- Password Grant - Connect from the SAP Concur App Center.
- Authorization Grant - Connect from the partner app.
- One-Time Password Grant - Connect from the partner app using email.
App Center Flow - Connecting from SAP Concur App Center
Password grant allows the user to establish a connection from App Center. The user needs to login via their SAP Concur credentials to access the app in the App Center. In the development and testing phase, you would be provided with the app listing solely for the purpose of development and testing. This app listing will be accessed via a deep link. This deep link will be provided to you before you start development. The instructions to connect/authenticate via password grant are:
-
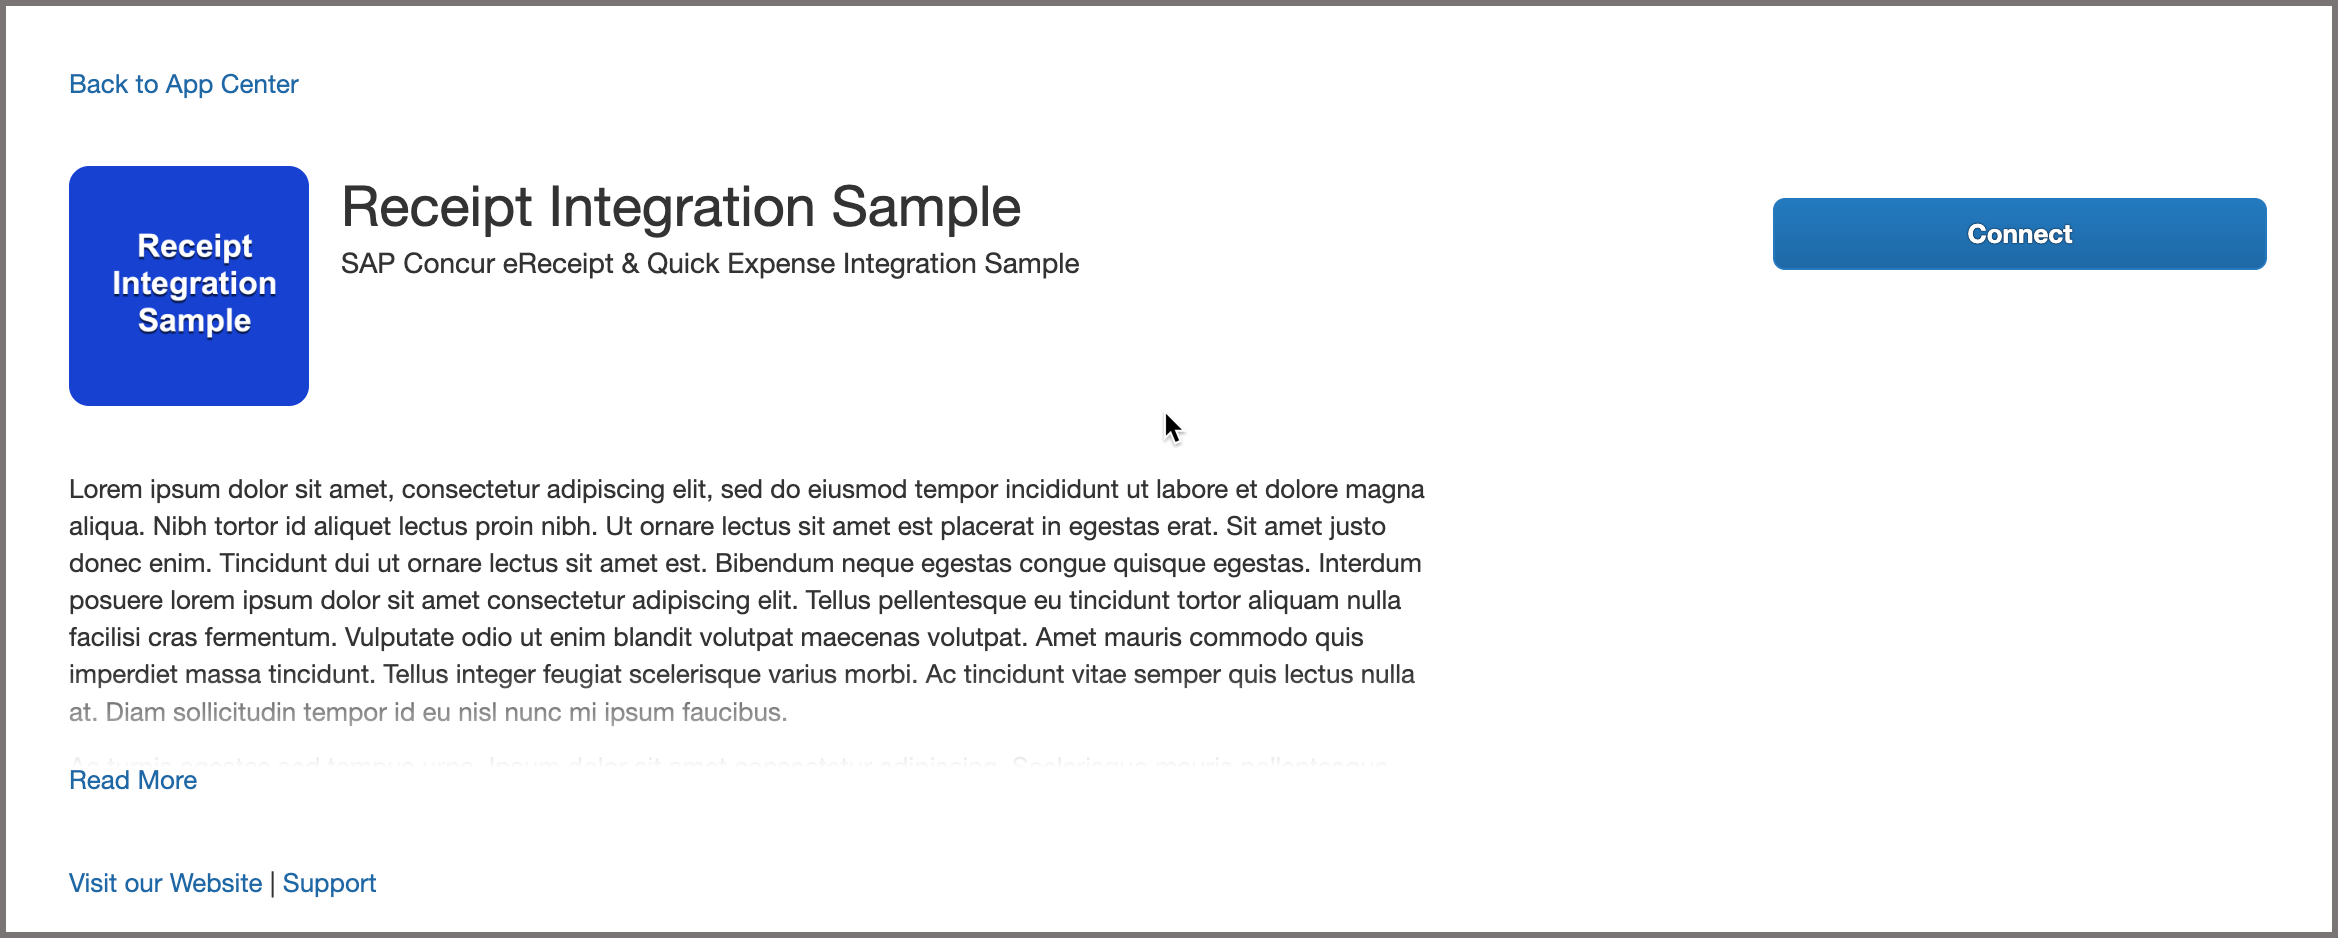
A logged in user clicks the connect button on the app listing in the App Center and authorizes your app to post data. App Listing Example:
-
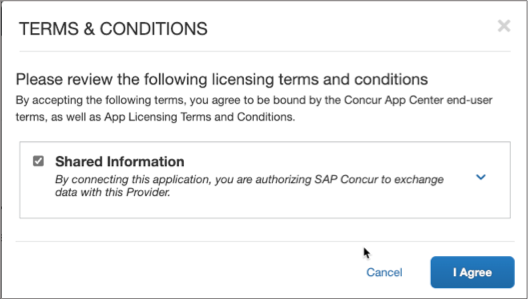
After the user clicks the “Connect” button, the user will see a prompt with the terms & conditions. User agrees the terms and conditions and clicks the “I Agree” button.
-
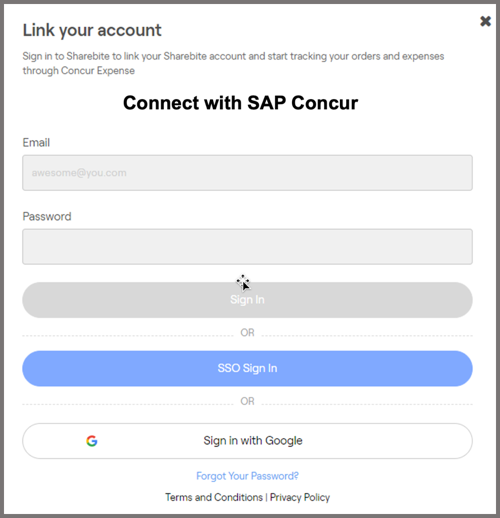
The authorization service will redirect the user to your app’s landing page. Please follow the App Center Design Guidelines to create a web page that listens for an HTTP GET request. The Guideline Checklist provides a list of required and recommended components of your landing page design. Please make sure all the required options are checked before scheduling the certification walkthrough. You must prepare separate landing pages for the development environment and the production environment. You must send the landing page redirect URIs to PlatformCertification@sap.com before starting development.
-
Your landing page should allow the user to log in with an existing account or create a new account.
-
The redirect URI will contain
idandrequestTokenparameters. Example:https://{partner-redirect-URI}?id=8568a4cd-8ffc-49d6-9417-be2d69aa075f&requestToken=5l85ae5a-426f-4d6f-8af4-08648c4b696b -
When your application receives the redirect call, strip the
idandrequestTokenvalues from the URI. -
Use
idas theusernameparameter value andrequestTokenas thepasswordparameter value on a post request to the SAP Concur authorization service to obtain the official OAuth2access_tokenandrefresh_tokenfor the user using the password grant while being geo aware.- There are two credential types allowed with password grant,
passwordandauthtoken. For the App Center partner, please use theauthtokencredential type for the connections from the App Center. - Do not post the request to the authorization service before confirming user identification in their App.
- Please refer password grant for the post body description.
Example : Password Grant
Request
POST /oauth2/v0/token HTTP/1.1
Content-Type: application/x-www-form-urlencoded
Host: glz.api.concursolutions.com
client_id={client_id} &client_secret={client_secret} &grant_type=password &username ={‘id’ from the redirect URL} &password ={‘requestToken’ from the redirect URL} &credtype= authtokenResponse
HTTP/1.1 200 OK
Content-Type: application/json
{ "expires_in": "3600", "scope": "{app-scopes}", "token_type": "Bearer", "access_token": "{access_token}", "refresh_token": "{refresh_token}", "refresh_expires_in": "{expiration time}", "id_token": "{id_token}", "geolocation": "https://us2.api.concursolutions.com" } - There are two credential types allowed with password grant,
- Decode the
id_tokento obtain the sub value and store this value as the userid(see https://jwt.io). - An
access_tokenis valid only for one hour. Theaccess_tokenshould be cached in memory and discarded after use. -
After the user has successfully completed the login/enrollment process, store the following with the user’s profile in your database.
refresh_token: (36 characters including dashes) valid for six months from the day and time issued.refresh_expires_in: expiration date & time in Epoch time format, please convert to UTC format.geolocation: to be used as the base URI when making API calls on behalf of the user.sub: (36 characters including dashes) The user id will be used to post receipts to the user’s SAP Concur account.
-
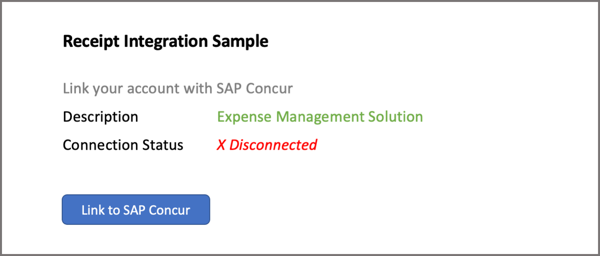
Confirm visually to the user that their partner app account has been successfully linked with their SAP Concur account.
- You now can use the
access_tokenfor making API calls.
Web Flow - Connecting from the Partner Web or Mobile App
Authorization Grant allows the user to connect directly from your website or the mobile app.
-
User clicks Link to Concur button within your website or mobile App. Partner Web or Mobile Connection Example:
-
Your app will make a call to the authorization service.
NOTE: the grant type must be accessed using the
www-version of the API Gateway in order to avoid certificate issues with some browsers. (ex: https://www-glz.api.concursolutions.com instead of https://glz.api.concursolutions.com)
Example:
   GET /oauth2/v0/authorize?client_id={your-app-clientId}&redirect_uri={partner_redirect_URI}&response_type=code HTTP/1.1
   Host: https://www-glz.api.concursolutions.com
-
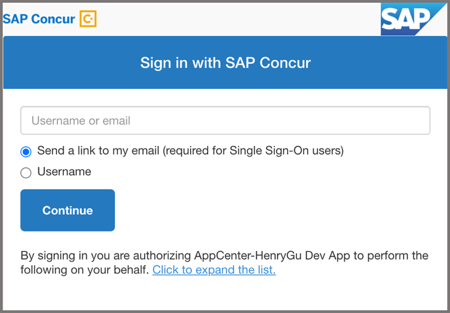
The authorization service will prompt the user with two options: Username or Send a link to my email
-
Handling the username/password option:
-
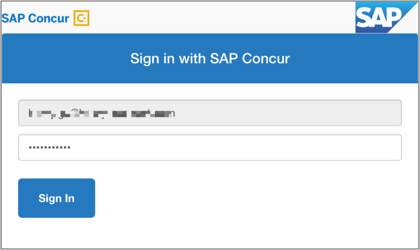
When users choose the username/password option, the authorization service will prompt the user to enter their SAP Concur credentials.
-
After successfully logging in, the user will be redirected to the partner’s redirect URI with a query parameter containing a one time use code and user’s geolocation, which will be used to obtain an official OAuth2
access_tokenandrefresh_token.Example:
https://{partner_redirect_URI}?geolocation={geolocation}&code={code}
-
-
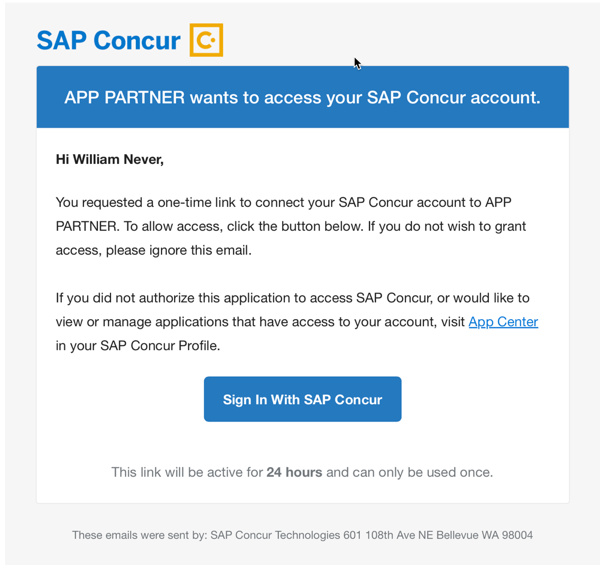
Handling the email option:
- The email option is designed for users who do not want to use passwords or those that do not have passwords such as single sign-on (SSO) users.
-
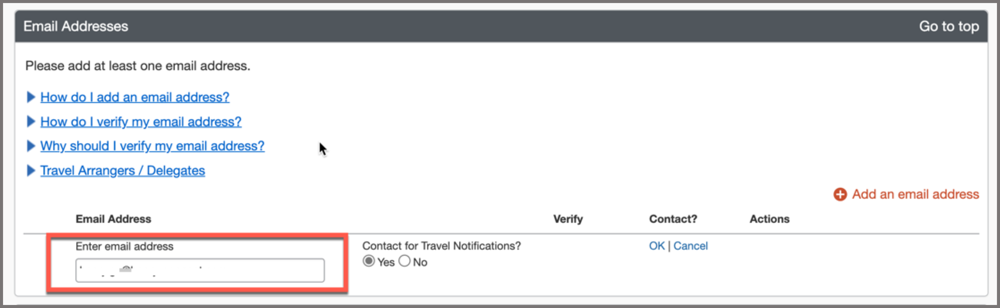
Email is sent IF the user provides their primary SAP Concur email address (email1).
-
After the user clicks the “Sign in with Concur” link within the email, the user will be redirected to your redirect URI with a query parameter containing a one-time use code and user’s geolocation, which will be used to obtain an official OAuth2
access_tokenandrefresh_token.Example:
https://{partner_redirect_URI}?geolocation={geolocation}&code={code}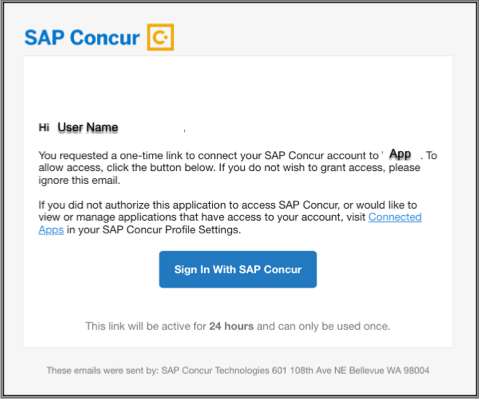
-
When your application receives the redirect call with the code and user’s geolocation, strip the
codevalue and user’sgeolocationfrom the redirect URI to use on a post request to the authorization service to obtain an official OAuth2access_tokenandrefresh_tokenusing the authorization grant. Refer to authentication grant documentation for the post body description.Example: Authorization Grant – Request An Access Token
Request
POST /oauth2/v0/token HTTP/1.1
Content-Type: application/x-www-form-urlencoded
Host: glz.api.concursolutions.com
client_id={client_id} &client_secret={client_secret} &grant_type=authorization_code &redirect_uri={redirect_uri}&code={code}Response
HTTP/1.1 200 OK
Content-Type: application
{ "expires_in": "3600", "scope": "{app-scopes}", "token_type": "Bearer", "access_token": "{access_token}", "refresh_token": "{refresh_token}", "refresh_expires_in": "{expiration time}", "id_token": "{id_token}", "geolocation": "https://us2.api.concursolutions.com" } -
Decode the
id_tokento obtain thesubvalue and store this value as the userid(see https://jwt.io). -
An
access_tokenis valid only for one hour. Theaccess_tokenshould be cached in memory and discarded after use. -
Store the following with the user’s profile in your database.
refresh_token: (36 characters including dashes) valid for six months from the day and time issued.refresh_expires_in: expiration date & time in Epoch time format, please convert to UTC format.geolocation: to be used as the base URI when making API calls on behalf of the user.sub: (36 characters including dashes) The user id will be used to post receipts to the user’s SAP Concur account.
-
Confirm visually to the user that their partner app account has been successfully linked with their SAP Concur account, and that the receipts will be posted to the user’s SAP Concur account after payment.
Connect from the Partner App Using Email
The one-time password grant leverages email to provide per user access tokens to client applications. This grant type requires the following steps:
-
User enters their email address associated with the SAP Concur profile within the partner’s website or mobile app. Partner one-time password (OTP) Connection Example below:
-
User clicks the Link/Connect button. Note: User may have more than one email associated with their SAP Concur profile.The email address used for this method should be the email address listed as Email1 on the user’s SAP Concur profile.
-
Your app will make a call to the authorization service to trigger the OTP email using OTP grant while being geo aware. Refer Request a one-time token for the post body descriptions. The following are reserved words and cannot be used as client application defined parameters for
/otpAPI:client_id,client_secret,channel_type,channel_handleExample
Request
POST /oauth2/v0/otp HTTP/1.1
Content-Type: application/x-www-form-urlencoded
Host: us.api.concursolutions.com
client_id={client_id} &client_secret={client_secret} &channel_type=email &channel_handle=william.never@companydemo.com &name=William Never &company=Company Demo &link=https://connect.companydemo.com/authResponse
HTTP/1.1 200 OK Content-Type: application/json { "message": "opt sent" } -
User will receive the email with ‘Sign in with Concur’ button.
-
After user clicks the “Sign in with Concur” link within the email, they will be redirected to the partner’s redirect URI with a query parameter
tokencontaining a one-time token that will be used to obtain an official OAuth2access_tokenandrefresh_token. Example:https://connect.companydemo.com/auth&token=dd-36w6vji244m5qsfy23a3jvw3no1e4c -
When your application receives the redirect call with the one-time token, strip the token value from the redirect URI and use that token on a Post request to the authorization service to obtain an official OAuth2
access_tokenandrefresh_tokenusing the OTP grant while being geo aware. - If you used the optional parameters in the /otp call in step 3, such as ‘name’, ‘company’ and ‘link’, please include these parameters in the following /auth API call too.
-
The following are reserved words and cannot be used as client application defined parameters for
/tokenAPI:client_id,client_secret,channel_type,channel_handle,scope,grant_type,otp.Example:
Request
POST /oauth2/v0/token HTTP/1.1
Content-Type: application/x-www-form-urlencoded
Host: us.api.concursolutions.com
client_id={client_id} &client_secret={client_secret} &grant_type=otp &otp={one_time_token} &channel_type=email &channel_handle=william.never@companydemo.com &name=William Never &company=Company Demo &link=https://connect.companydemo.com/authResponse
HTTP/1.1 200 OK
Content-Type: application/json
{ "expires_in": "3600", "scope": "{app-scopes}", "token_type": "Bearer", "access_token": "{access_token}", "refresh_token": "{refresh_token}", "refresh_expires_in": "{expiration time}", "id_token": "{id_token}", "geolocation": "https://us2.api.concursolutions.com" } -
Decode the
id_tokento obtain thesubvalue and store this value as the userid(see https://jwt.io). -
An
access_tokenis valid only for one hour. The access token should be cached in memory and discarded after use. -
Store the following with the users profile in your database.
refresh_token: (36 characters including dashes) valid for six months from the day and time issued.refresh_expires_in: expiration date & time in Epoch time format, please convert to UTC format.geolocation: to be used as the base URI when making API calls on behalf of the user.sub: (36 characters including dashes) The user id will be used to post receipts to the user’s SAP Concur account.
- Confirm visually to the user that their partner app account has been successfully linked with their SAP Concur account, and that the receipts will be posted to the user’s SAP Concur account after payment.
Token Management
Refreshing Token
-
You will obtain a fresh
access_tokenbefore making API calls on behalf of your users using the Refreshing A Token API call. -
A
refresh_tokenis valid for six months. Calling the API to refresh theaccess_tokenwill also get the expiration time ofrefresh_tokenupdated. And schedule a process to run that will refresh arefresh_tokenprior to the expiration date if necessary. -
The below elements are returned with the new
access_token, replace previously stored values for the user in your database:refresh_token(replace)refresh_expires_in(replace)geolocation(replace)
-
If the user does not log in for six months the
refresh_tokenwill expire and the user’s partner account and SAP Concur account will be de-linked. To prevent this from happening, build a scheduled job that scans your database for expiration dates and refreshes tokens X days prior to expiration. Refer Refreshing A Token API for the post body description and example.
- Watch this section of the video SAP Concur Integration 3 of 5 ; API Tokens, which explains the difference between refresh and access tokens and how to refresh the access token.
Revoke Token
You need to revoke a user’s access_token if the user terminates their account from your application. To revoke a user’s access_token call the /app-mgmt/v0/connections endpoint with a DELETE action. You are required to demonstrate your integration has the capability to revoke access_token for the inactive or disconnected users.
Refer to revoking a token for more details and the post example.
Being Geo Aware
A client’s SAP Concur account may reside one of our many data centers. During the client onboarding process, determine in which datacenter the client’s instance resides. When your application is created, you will be provided with a client_id, client_secret, and geolocation. When obtaining a token, your application should use the base URI for the geolocation in which your application exists.
You will need to be aware of the geolocation where the user exists and make the call to the APIs correctly. As you do not know the user’s geolocation when you request the token for the first time, you should always make the API call using the default Base URI.
For a user hosted on both the US data center and EU data center, please use the default Base URI https://glz.api.concursolutions.com.
If you receive the error code 16 (“user lives elsewhere”) while calling the authentication service, the error message returns a new geolocation. Use this new ‘geolocation’ as the Base URI to call the Auth API again to get the token.
For example, if you make following API call to https://us2.api.concursolutions.com by mistake:
POST /oauth2/v0/token HTTP/1.1
Content-Type: application/x-www-form-urlencoded
Host: us2.api.concursolutions.com
.....
You will get a HTTP 400 error with error code 16 like below:
HTTP 400 Bad Request
{
  "error": "invalid_request",
  "concur-correlationid": "{correlation_id}",
  "error_description": "user lives elsewhere",
  "code": 16,
  "geolocation": "https://us.api.concursolutions.com"
}
You should make another call to https://us.api.concursolutions.com which is the geolocation value returned in error message.
Note: This
geolocationvalue might NOT be user token’s geolocation. It only redirects you to the correct API endpoint.
POST /oauth2/v0/token HTTP/1.1
Content-Type: application/x-www-form-urlencoded
Host: us.api.concursolutions.com
.....
Then you will get the user access token with the correct user geolocation.
Note: When obtaining the
access_tokenvia an authentication API, the geolocation data will be included in the response. The geolocation should be stored along with theaccess_token. Your app will then be able to make subsequent calls using the token and the correct end points based on the geolocation.
Base URI
When making API calls, the appropriate base URI should be used. There are three different scenarios:
- Obtaining a token for a user.
- Refreshing a token.
- Calling other APIs.
The base URI for obtaining a token will use your application’s geolocation. The base URI for refreshing tokens and all other API calls will use the token’s geolocation.
- GLZ = https://glz.api.concursolutions.com
- US2 Production = https://us2.api.concursolutions.com
- EU2 Production = https://EU2.api.concursolutions.com
When obtaining a token, your application should use the base URI corresponding to the grant type being performed, as follows:
| Grant Type | URI |
|---|---|
| Authorization | Use the GLZ base URI |
| Password (credtype = authtoken) | Use the GLZ base URI |
| One Time Password | Use the base URI corresponding to the user’s geolocation |
When obtaining the token, the token’s geolocation will be included in the response. The token’s geolocation should be stored along with the token. Your application will then make subsequent calls using the token and the correct endpoints based on the token’s geolocation.
The full list of available token geolocations is available on the Base URIs page.
Posting eReceipts
For information on getting started with Receipts v4.
- You should select General eReceipt type or Grand Transportation eReceipt type from the Supported Receipt type list and retrieve the list schemas for the selected receipt types.
- To ensure that you are using the correct endpoint URLs, the safest practice is to check the service index before every request. Get service Index
- We generate a standard receipt if you do not provide a receipt image.
- We can display your app logo in standard generated receipts (size 100x100 px). Please send your company logo image file (.png) to PlatformCertification@sap.com.
- If your app currently generates a receipt image, (.png, .jpg, .tif, .pdf, or other image file), you can include it in your post. Follow the requirement of supported image formats if you are posting the eReceipts with images.
Post a General eReceipt
- Obtain a fresh
access_tokenfor the user using refresh grant. - You will need the user id previously stored in the user’s profile to post receipts on their behalf.
- Post receipt using the Post Receipt endpoint.
- You should store the
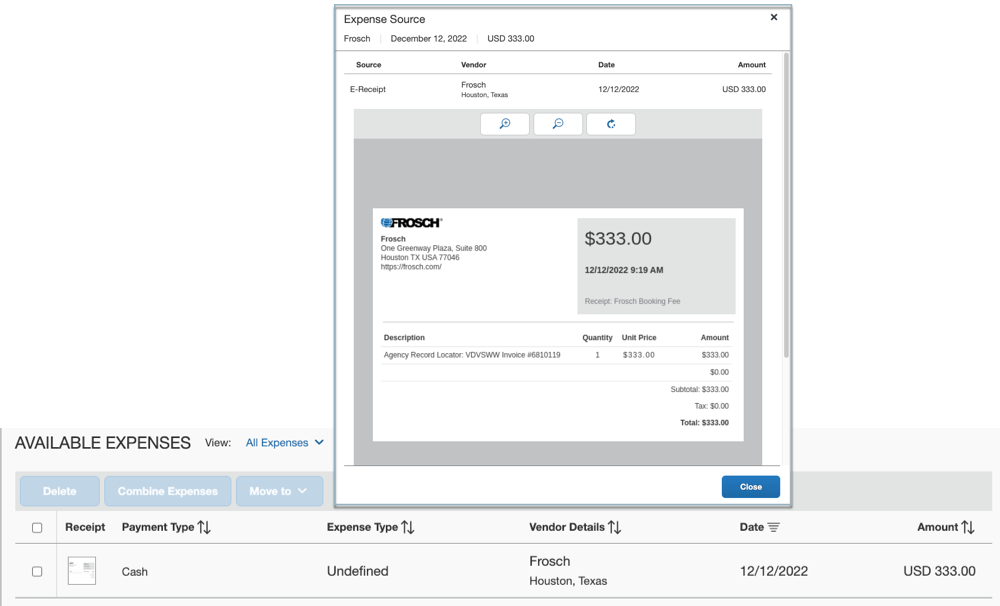
concur-correlationidand the Location link from the response headers even for successful responses, this will facilitate support efforts in case of a missing receipt from a user’s SAP Concur account. - A general eReceipt is not mapped to any expense type. When a user adds the eReceipt into the expense report, the expense entry’s expense type will be “Undefined”. The user needs to change the expense type accordingly.
The general eReceipt schema includes all receipt core definitions.
Example: Posting a General e-Receipt
Request
   POST /receipts/v4/users/{UUID} HTTP/1.1
   Host: {HOST}
   Authorization: Bearer {ACCESS_TOKEN}
   Link: <http://schema.concursolutions.com/general-receipt.schema.json>; rel="describedBy"
   Content-Type: application/json
    {
    "reference": "Frosch Booking Fee",
    "dateTime": "2022-12-12T09:19:02-0500",
    "total": "333.00",
    "subtotal": "333.00",
    "taxesTotal": "0.00",
    "currencyCode": "USD",
    "seller": {
        "name": "Frosch",
        "location": {
            "name": "Booking Fee",
            "internetAddress": "https://frosch.com/",
            "address": {
                "streetAddress": "One Greenway Plaza, Suite 800",
                "addressLocality": "Houston",
                "addressRegion": "TX",
                "addressCountry": "USA",
                "postalCode": "77046"
            }
        }
    },
    "taxes": [
        {
            "amount": "0.00"
        }
    ],
    "payments": [
        {
            "amount": "333.00"
        }
    ],
    "lineItems": [
        {
            "sequenceNumber": 1,
            "reference": "Frosch Invoice",
            "description": "Agency Record Locator: VDVSWW Invoice #6810119",
            "quantity": 1,
            "unitCost": "333.00",
            "subtotal": "333.00",
            "taxesTotal": "0.00",
            "total": "333.00",
            "taxes": [
                {
                "amount": "0.00"
                }
            ]
        }
    ]
    }
Response
HTTP/1.1 201 OK
Response Header
   ...
   Content-Length: 0
   Concur-correlationid: c559ab367ff8436d1d0c4ffe917664a3
   Link:<http://schema.concursolutions.com/general-receipt.schema.json>; rel="describedBy", <https://us2.api.concursolutions.com/receipts/v4/status/eed70d8a344e4b8c9d8ad2b7b37c34e2>; rel="processing-status"
   Location: https://us2.api.concursolutions.com/receipts/v4/eed70d8a344e4b8c9d8ad2b7b37c34e2
   ...
Receipt is now shown in the Available Expense list and the receipt Expense Type is “Undefined”.
Example: Posting a General e-Receipt with Image
Request
POST /receipts/v4/users/{UUID} HTTP/1.1
Host: {HOST}
Authorization: Bearer {ACCESS_TOKEN}
Link: <http://schema.concursolutions.com/general-receipt.schema.json>; rel="describedBy"
Content-Type: multipart/form-data;
Content-Disposition: form-data; name="image"; filename="receipt_image.pdf"
Content-Type: application/pdf
Content-Disposition: form-data; name="receipt"
{
      "dateTime": "2022-10-22T13:00:00+0800",
      "reference": "91310000",
      "seller": {
      "taxId": "MA1FL0TJ7J",
      "name": "ABC Corporation",
      "description": ",",
      "location": {
         "address": {
               "streetAddress": "225 32nd Ave",
               "addressLocality": "Seattle",
               "addressRegion": "WA",
               "addressCountry": "US"
               }
         }
      },
      "total": "180.0",
      "taxesTotal": "20.0",
      "subtotal": "160.0",
      "payments": [
         {
               "amount": "180.0"
         }
      ],
      "currencyCode": "USD"
}
Response
HTTP/1.1 201 OK
Post a Ground Transportation eReceipt
- Obtain a fresh
access_tokenfor the user using refresh grant. - You will need the user id previously stored in the user’s profile to post receipts on their behalf.
- Post receipt using the Post Receipt endpoint.
- You should store the
concur-correlationidand the Location link from the response headers even for successful responses, this will facilitate support efforts in case of a missing receipt from the user’s SAP Concur account. - The Ground Transportation eReceipt Schema includes all forms of non-aerial transportation and all Receipt Core Definition.
Refer to the Grand Transportation eReceipt post example.
Response Codes
Response Codes (Success/Failure) Can be found at:
https://developer.concur.com/api-reference/receipts/response-codes.html
Posting Quick Expenses
The Quick Expense API can be used to create an expense with basic information such as date, amount, and expense type, with or without a receipt image. This expense can be added to an expense report within Concur Expense, allowing the user to provide additional details such as attendees, itemizations, etc.
Creating a Quick Expense
- Obtain a fresh
access_tokenfor the user using refresh grant. - You will need the user id previously stored in the user’s profile to post receipts on their behalf.
- Post the quick expense using the Quick Expense endpoint.
- You should store the
concur-correlationidfrom the response headers and thequickExpenseIdUrifrom the response body. This will facilitate support efforts in case of a missing quick expense from user’s SAP Concur account. - The Quick Expense Schema includes required fields of
expenseTypeId,transactionAmount, andtransactionDate. -
The supported
expenseTypeIdvalue can be retrieved from Expense Group Configurations v3.0. The frequently usedexpenseTypeIdvalues are listed below:expenseTypeId Description AIRFR Airfare AWRDS Gifts - Clients BANKF Bank Fees BRKFT Breakfast BUSML Entertainment - Clients CARRT Car Rental CELPH Mobile/Cellular Phone DINNR Dinner DUESX Professional Subscriptions/Dues GASXX Fuel GIFTS Gifts - Staff LNDRY Laundry LOCPH Telephone/Fax LODNG Hotel LUNCH Lunch MILEG Personal Car Mileage MISCL Miscellaneous OFCSP Office Equipment/Hardware ONLIN Internet/Online Fees PARKG Parking POSTG Postage SEMNR Seminar/Course fees TAXIX Taxi TOLLS Tolls/Road Charges TRAIN Public Transport TRDSH Marketing/Promotional Costs 01004 Entertainment - Staff 01005 Courier/Shipping/Freight 01006 Printing/Photocopying/Stationery 01007 Office Supplies/Software 01009 Tips/Gratuities 01012 Tuition/Training Reimbursement 01025 Train 01027 Business Meals (Attendees) 01028 Individual Meals
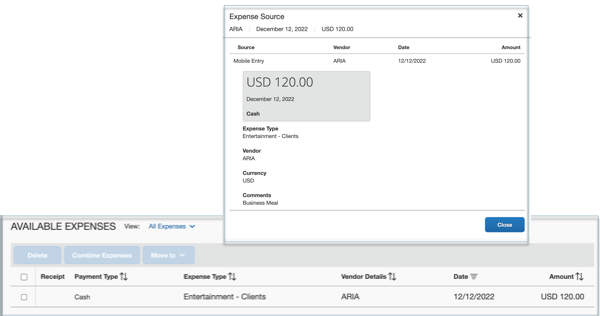
Example: Posting a Quick Expense
Request
POST /quickexpense/v4/users/{UUID}/context/TRAVELER/quickexpenses HTTP/1.1
Host: {HOST}
Authorization: Bearer {ACCESS_TOKEN}
Content-Type: application/json
{
   "Comment": "Business Meal",
   "expenseTypeId": "BUSML",
   "location": {
      "city": "Bellevue",
      "countryCode": "US",
      "countrySubDivisionCode": "US-WA",
      "name": "ARIA"
   },
   "paymentTypeId": "CASHX",
   "transactionAmount": {
      "currencyCode": "USD",
      "value": 120.00
   },
   "transactionDate": "2022-12-12",
   "Vendor": "ARIA"
}
Response
HTTP/1.1 201 OK
{
   "mobileEntryKeyUri": "https://us2.api.concursolutions.com/quickexpense/v4/users/{UUID}/context/TRAVELER/quickexpenses/1234157338",
   "quickExpenseIdUri": "https://us2.api.concursolutions.com/quickexpense/v4/users/{UUID}/context/TRAVELER/quickexpenses/506CF67C85BA436097F434F39CAE7DD8"
}
The sample quick expense item is now shown in the Available Expense list.
Postman Sample Collections
Click following links to download the postman sample collection zip file or click the ‘Run in Postman’ button to fork the collection to your workspace or import the collection to Postman.
- Authentication API Postman Collection
- General eReceipt Postman Collection
- Ground Transportation eReceipt Postman Collection
- Quick Expense Postman Collection
Creating and Updating an App Center Listing
You need to send the complete landing page content to PlatformCertification@sap.com. The CPM and marketing team review and approve the listing documents and send the confirmation to your marketing team. You need the this approval prior to scheduling the final certification call with PlatformCertification@sap.com. This includes:
- App Center Listing Form (Download)
- Listing Images (Please follow the image specification in the App Center Listing Form.)
The CPM and marketing team will review your content for clarity, ease of reading, and consistency with the SAP Concur brand guidelines. The CPM and marketing team will return it with any comments or suggestions. Please plan for a 10 to 14-day turnaround window for the review process.
Once your content is finalized, your listing will be queued for launch on an agreed upon date. Your app must be certified prior to launch.
Please visit Go To Market page to prepare your SAP Concur App Center launch.
User Connection apps are launched on the following release dates.
Error Handling
Retry Logic for Timeouts
Your app should have the retry logic for any API call timeout. For example, retry for every 30 seconds if you get the API call timeout and retry 5 ~ 10 times.
HTTP Response Code and Error Codes
HTTP responses with status code of 4xx, 5xx are all treated as errors. The HTTP response body contains the details of the error, including error code, error name, error description, etc.
For example, 4xx class errors have a JSON response with the following fields.
{
  "code": "<number>",
  "error": "<error>",
  "error_description": "<error_descriptio>",
  "geolocation": "<geolocation_url_where_user_lives>"
}
Please refer to the Authentication Response Codes list for more details about Authentication errors.
Please refer to the Receipts v4 API Response Codes list for more details about receipts errors.
Error 401
Error 401 is an authentication related error. A 401 will be returned when the JWT used for authentication is valid, but doesn’t match the correct user. When using a user JWT, the request must be to a URL for the same user that is represented in the JWT.
Error 403
Error 403 is an authentication related error. A 403 will be returned if there is no JWT in the authorization header of the request, or if the JWT is invalid or expired.
Example:
{
   "error": "invalid_grant",
   "concur-correlationid": "72a8bb8479.........02244b8",
   "error_description": "bad or expired refresh token",
   "code": 108,
   "geolocation": "https://us2.api.concursolutions.com"
}
This response is also for cases where the JWT does not include the scope required to fulfill the request.
Error 404
The receipt(s) you requested could not be found. Check that the receipt and/or user ID are correct.
Error 500/503
Error 500 is an internal server error. If you receive an error 500 while posting an eReceipt, you should retry the API at least 3 times. If you still encounter an error 500 after retrying, please log a support ticket.
Error Logging
If you receive an error while calling an API, please save the error code, error message, error responses body. You must save the concur-correlationId from the API response header, which is required to log the support ticket.
FAQ
How can I get support during the development phase?
You should send your questions to PlatformCertification@sap.com. We will review your request/questions and will reply within 5 business days.
How do I schedule the certification walkthrough?
There will be a one week certification time window per month. You should send your certification walkthrough request to PlatformCertification@sap.com one month before the certification date you would like schedule. We will reply with a meeting invitation within 5 business days.
Please find your certification date time based on the certification calendar.
How do I log a support case?
You should be provide the contact detail to your SAP Concur BD/Alliance manager or PlatformCertification@sap.com for creating an account on the partner support portal.
To log a support case, please login and open a partner support case from partner support portal. You will need to provide the required information when logging a support case.
Where can I find API or product update information?
The SAP Concur API monthly updates can be found in the Developer Platform Release Notes.
The SAP Concur product related update can be found in the Client Shared Release Notes.