Callouts and Application Connectors
Callouts allow clients to add an interaction with an outside system to their users’ SAP Concur experience. The callouts require a web application, called an application connector, which we will contact when appropriate. Application connectors can be hosted on the client’s site or on a third-party hosting site.
Third-party developers can create callouts to provide SAP Concur clients access to information systems they manage. These developers partner with us to have their application connectors reviewed. Once reviewed, applications are available for SAP Concur clients to purchase and configure.
Partner apps that want to use callout services must have their endpoint server(s) added to an SAP Concur safe list. This is done by logging a case with Support to have your host added.
The available callouts are:
- Fetch Attendee Data
- Fetch List Item
- Event Notification
- Launch External URL
Fetch Attendee and Fetch List Item send information out from the SAP Concur platform to an application connector that interfaces with a external system. The connector runs a search on the external system. The results are then returned to us, and are then presented to the user.
The Event Notification callout allows clients to receive notification of specific moments in the workflow of an expense report. When a report enters the desired workflow state a request is sent to the external system. The system can call into the SAP Concur platform to get all the details of a report and perform appropriate actions.
The Launch External URL callout gives clients and developers to extend the functionality of the SAP Concur platform, providing a means to deliver custom user interactions, or access functionality found in an external system.
The client can arrange to add an Expense Entry form field that is configured to use the Launch External URL callout to a Concur Expense Entry form. Concur Expense will display this field with an attached button that launches a separate window when clicked. The window is controlled by an application connector, created by the client, a third party developer, or us. The application connector is a web server that presents information in the window.
The application connector can access SAP Concur platform data through the web services, or can access data in an external system. Once the user has completed their actions in the window (such as performing a search or completing a wizard), they click a button such as “Done” that indicates they have concluded their work in the window. The application connector then closes the window.
The application connector can use web services to send information to the SAP Concur platform, to update field values on the expense entry form or other form types. The application connector may send the updates before or after the user closes the window. When the user returns to the SAP Concur platform, the page refreshes and the user sees the current values.
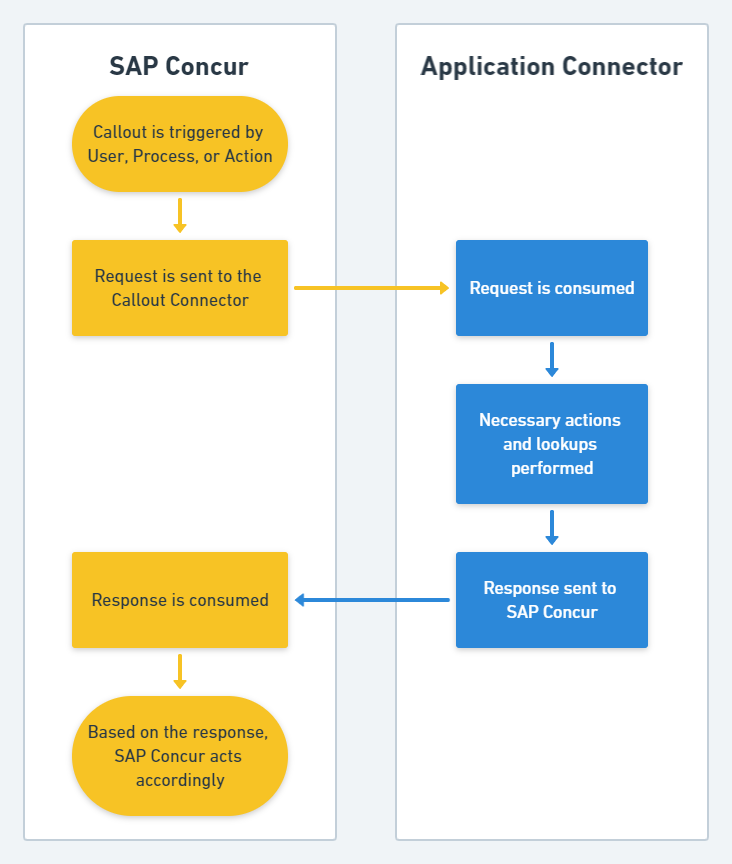
Process Flow
Application Connector Management
SAP Concur administrators use the Manage Application Connectors link on the Web Services page under Administration to register, test, and enable application connectors.
Security
We will make calls to the application connector’s endpoint using SSL. During configuration, we will connect to the application connector to validate that its hostname and access credentials are valid.
We will not be able to connect to the application connector until a certificate signed by a Certificate Authority (CA) is installed in the application connector. If you are hosting the application connector, you will need to install the signed certificate before We can access the connector.
Authenticating to the Application Connector
Expense passes credentials using HTTP Basic Auth to authenticate with the application connector. By default, these credentials are stored in the appropriate web configuration file for your platform, such as web.xml or web.config. The steps to configure Expense with the credentials are detailed below.
Managing Application Connectors
SAP Concur administrators use the Manage Application Connectors link in Web Services under Administration to register, test and enable application connectors.
User Permission
The Web Services links can be accessed by users with the following permission:
-
Developer Sandbox or Expense/Invoice/Travel/Travel Request Standard:
- Administer: Users with this permission can register and modify application connectors.
-
Expense/Invoice/Travel/Travel Request Professional:
-
Web Services Administrator: Users with this permission at companies that are Development Partners can register and modify application connectors.
-
All Admin roles: Users with this permission at companies that are Development Partners can register and modify application connectors.
-
Accessing Application Connector Registration
The Manage Application Connectors link on the Web Services page is used to register, test and enable or disable application connectors. To access application connector registration:
- On the home page, select Administration.
- Select Company.
- Select Web Services.
- Click Manage Application Connectors. The Application Connector Registration page appears.
Note you must be one of the roles specified in the User Permission section to complete these steps.
Registering an Application Connector
Once a development partner has configured a application connector, it must be registered with the SAP Concur platform. To register an application connector:
- On the Application Connector Registration page, click New. (Please refer to Accessing Application Connector Registration section for how to access this page.)
- In the System area, complete all of the required fields.
| Field | Description |
|---|---|
| Name | Enter the name that should appear in the list of connectors. |
| Description | Enter the description of the function of the connector, such as what back-end system it might connect to. |
| Host Name | Enter the hostname for the connector. Example: https://{servername} |
| User Name | Enter the user name required to authenticate with the host. This must be the same as the user name specified in the configuration file for the application connector. Note: the user name must be at least 10 characters and the maximum allowed length is 50 characters. |
| Password | Enter the password required to authenticate with the host. This must be the same as the password specified in the configuration file for the application connector. Note: the password must be at least 10 characters and the maximum allowed length is 50 characters. |
- Click Test Connection. We will attempt to connect to the test connection endpoint https://(host name)/system/v1.0/testconnection, using a GET method with the supplied credentials as HTTP Basic Authentication. If you have not configured the test connection endpoint, the test will fail.
Note: A successful Test Connection request is required to set the connector to “Verified” before it can be used for any of the callout services.
- In the Services section, select an outbound message or callout that the connector will interact with.
- Click Configure. The Configure Service window appears.
- Enter the endpoint that the SAP Concur platform will connect to on the host. Example: /attendee/v1.0/find
- Select the Enabled check box if the endpoint is ready for use. Usually you will do this after you have implemented and tested the endpoint in your application connector.
- Click Save. The service is configured for your host.
- Repeat steps 4-8 for each service to configure.
- Click Save.
Modifying an Application Connector Registration
Once an application connector registration has been created, the fields can be modified. Services can be enabled or disabled from the Modify page. To modify an application connector:
- On the Application Connector Registration page, select the desired registration from the list. (Please refer to Accessing Application Connector Registration section for how to access this page.)
- Click Modify.
- Edit the system fields as necessary.
- Click Test Connection to verify your changes.
- Edit the services configurations as necessary.
- Click Save to return to the Application Connector Registration page.
Deactivating an Application Connector Registration
Application connector registrations can’t be removed, but can be deactivated. Connectors are deactivated by setting all the associated services to inactive. To deactivate an application connector:
- On the Application Connector Registration page, select the desired connector. (Refer to the steps above in the Accessing Application Connector Registration section for how to access this page.)
- Click Modify.
- Select the active Service.
- Click Configure.
- Clear the Active check box.
- Click OK.
- Click Save.